Build Your Own ICO in 5 Minutes
Before we start, you’ll need Node.js and Yarn installed.
We’ll use Hygen to drive the creation of our contracts. Hygen is a new productivity tool that lets you generate code in a fun way, for any purpose and any platform.
Let’s install Hygen globally:
$ yarn global add hygen
Clone our base repository and cd into it. We already have Hygen generators in it.
$ git clone https://github.com/jondot/5-min-ico; cd 5-min-ico
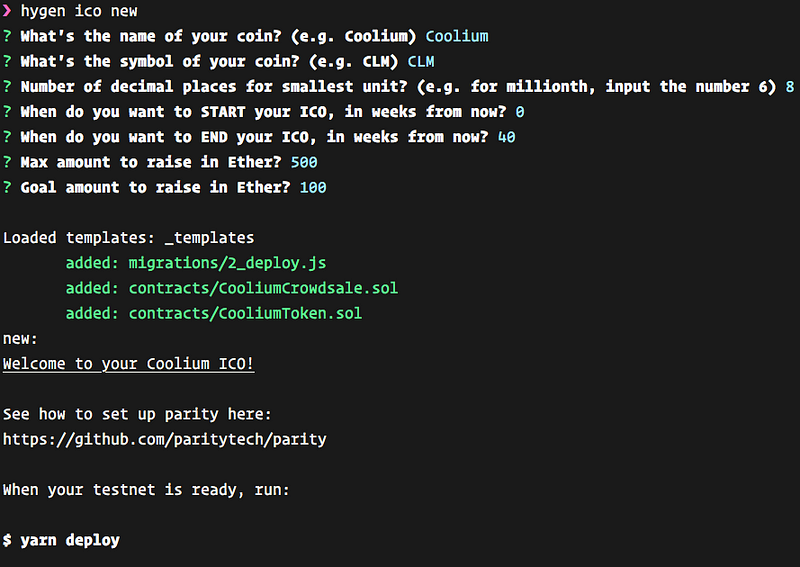
Run hygen with the ico generator, and answer the questions about your ICO:

That’s it. You can verify that your contracts build:
$ yarn build
And finally, you can deploy to your chosen testnet (read below if you don’t have one set up or don’t know what that is):
$ yarn deploy
Using a Testnet
If you don’t want to deploy to a real blockchain, and want smooth sailing, you can just use Ganache, which is the most recent evolution of a local test tool (you may have heard about testrpc previously) to help simulate and develop on the blockchain. It’s just a desktop app you need to install.
Using Ganache, you can deploy with zero configuration or set up (but do check its settings, you might have to change the port it uses to 8545).If you want to get your hands dirty with a real blockchain (still a testnet), keep reading.
You need to deploy to an Ethereum network. Using Parity we’ll work against the Kovan testnet (one of many test networks that you can use), which is fast and stable.
See how to install parity for your OS here and after installing it, we’ll run it with the Kovan testnet.
If you’re on macOS and use Homebrew, I’ll save you the reading:
$ brew tap paritytech/paritytech && brew install parity
Now, run Parity on a separate terminal window:
$ parity ui --chain kovan
Once started, it may take some time for it to sync with other nodes, so be patient. You’ll be able to see on the UI what’s the health of your node.
Meanwhile, Parity UI will open on your browser, fiddle with it a bit, but primarily, create a new account. Read here for more information about how to do that. The deploy script will use the first account it finds, and will use funds from it on order to fuel its deploy transactions.
We’re almost ready to deploy. Deploying to Kovan requires that you get some ‘fake’ ETH into your account.
You need to go here in order to understand which way you prefer to use, in order to get some ETH into your account (I recommend going on the Gitter chat and requesting it).
That’s it! After starting up and some ETH in your account, you can deploy your ICO contracts to a blockchain:
$ yarn deploy
Note #1, check your Parity UI for any approval request during deploy (and approve it).
Note #2, if you’re getting this error:
Error: The contract code couldn't be stored, please check your gas amount.
You need to increase your amount of GAS (edit the popup that opens in Parity UI to approve the request).
Note #3, if you’re having too much problems with the Kovan network (no peers, slow deploy/neverending deploy, can’t get ETH into your account), you can use the Ropsten network (get ETH for Ropsten here):
$ parity ui --chain ropsten
```After deploy finishes you’ll have a Crowdsale and Token addresses in the deploy output.
Deploying CooliumCrowdsale... ... 0x685c094ac05f2f3fc35754cae56cba54b0c1b7f4be1f7765b9dfb936bec632bf CooliumCrowdsale: 0x4e72770760c011647d4873f60a3cf6cdea896cd8 Saving successful migration to network... ... 0x2613896914f5d1eeaed6be42e3e0466d891206e27c197a7bac0078225f4d693a CooliumToken: 0xcee94e5d4c424e229af969aa1c1fd0e1a9de9adb
In order to test participating in your ICO:

- Remember this is all on the testnet so configure your client to it (you can use Metamask to send to Kovan/etc.)
- Make sure the ICO started (remember the start time you set?).
- Make sure people send ETH to the Crowdsale address.
- For production ICO, you need to repeat this process with the Ethereum blockchain, which means you’ll need real ETH funds, etc. (out of scope).

### Recommended Tools and Libraries

If you’d like to use the code you generated as a starting point, and keep on developing for the Ethereum blockchain, you might want to get familiar with a few more things.

- Install the [solidity](https://github.com/juanfranblanco/vscode-solidity) vscode extension for linting, errors and general IDE assists.
- We use [truffle](https://github.com/trufflesuite/truffle) as an Ethereum development framework. At the time of writing there’s _very_ little reason to look elsewhere (and there are a few alternatives).
- We use [Zeppelin](https://github.com/OpenZeppelin/zeppelin-solidity) which is quickly becoming an industry standard for writing secure Solidity contracts and it also has blueprints for common tasks. In fact all of the complexity of our contracts (and all of the credit) goes there.
- Use [Metamask](https://metamask.io) to interact with your crowd sale. It’ll be nicer overall.
- We use [Hygen](http://www.hygen.io) to automate the entire coding process.
- We use [Parity](https://github.com/paritytech/parity) to work against an Ethereum blockchain.
- We use [Ganache](https://github.com/trufflesuite/ganache) for faster workflow and testing when deploying.

### Conclusion

This little walkthrough demonstrated how easy it is to build a crowdsale for an ICO from an Ethereum contract programming point of view. We did it on the fly, with [Truffle](https://github.com/trufflesuite/truffle), [Zeppelin](https://github.com/OpenZeppelin/zeppelin-solidity) and we made it fun with [Hygen](http://www.hygen.io).

Obviously, if you’re really planning an ICO — the devil is in the details, so don’t just blindly take whatever that’s here and use it. You can, however, use it as a starting point and as a way to understand how you want your ICO to work.